
41 Activity 2: HMW gDNA Binding and Elution
Note: In all of the following steps, it is crucial not to let the gDNA dry out between steps and between buffers. Move quickly, keep caps closed, and take note of times where you’ll need to have new solutions prepared before removing old ones.
1. Using clean forceps, add 2 DNA Capture Beads to each sample, which are now in Monarch 2 ml Tubes.
2. Add 550 µl isopropanol to each sample, close the cap, and invert slowly and gently 25–30 times.
a. Each inversion should take 5–6 seconds. Slow and consistent inversions are critical for the DNA to bind to the beads. The beads may become stuck to the bottom of the tube as you go; lightly flick the tube to release them and continue.
b. After 2-3 inversions, the solution should start to become thicker and the DNA will start wrapping around the beads. As the DNA binds to the beads, the solution will gradually thin out, and by the end of 30 inversions, it should no longer be thick.
c. Invert as many times as is necessary to bind the DNA to the beads. It could take up to 50, but after that, not much will get done.
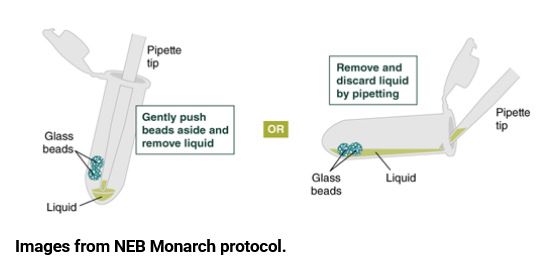
3. Remove and discard the excess liquid by pipetting. The DNA can dry out very quickly, so it’s important to add the next buffer immediately after pipetting out the isopropanol.
a. To remove the liquid, you can use either of the methods pictured below. In the past, the right method has yielded more liquid and interfered less with the beads.
4. Add 500 µl gDNA Wash Buffer, close the cap, and mix by inverting the tube 2–3 times. Then remove the gDNA Wash Buffer using the same method as the previous step.
a. The gDNA complex should condense more tightly around the beads.
5. Repeat Step 4 and remove the gDNA Wash Buffer.
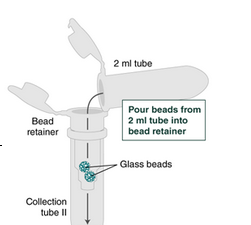
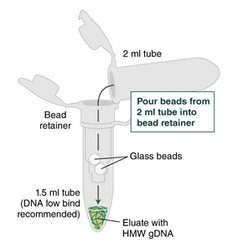
6. Place a labeled bead retainer into each Monarch Collection Tube II. Pour the beads from the 2 ml tube into the bead retainer and close the cap. You can discard the 2 ml tube.
a. To prevent the gDNA from drying out, keep the cap closed after transferring.
7. Use a mini centrifuge to remove any residual wash buffer from the beads. Only spin out for a moment (≤1 second) so as not to dislodge the gDNA from the beads.
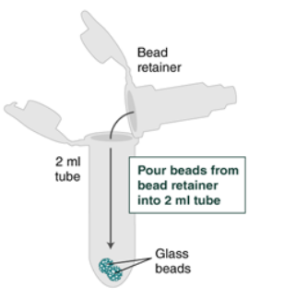
8. Pull out the bead retainer from the first collection tube, pour the beads into the other labeled 2 ml tube, and insert the used bead retainer into the labeled 1.5 ml microfuge tube for later use during elution. Discard the used collection tube.
9. Immediately add 100 µl Elution Buffer II onto the glass beads and incubate for 10 minutes at 56°C in a thermal mixer with agitation at 300 rpm.
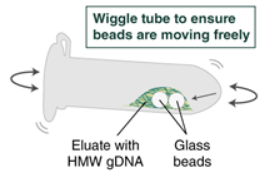
a. At 3 minutes, check to make sure the beads are not stuck to the bottom of the tube by tilting the tube almost horizontally and gently shaking. If they become stuck for too long, the DNA will not release properly from the beads.
b. Repeat the above process at 7 minutes.
10. After incubating, pour the eluate and beads into the bead retainer, which should already be inserted into a 1.5 ml microfuge tube.
a. Remember to close the cap after transfer.
b. Some of the eluate may stick to the walls of the 2 ml tube when you transfer. If so, spin down for 1 second in the centrifuge, and pour again. Pipette carefully if necessary.
11. Centrifuge each sample for 30 seconds at 12,000 x g to separate the eluate from the glass beads. After separating, discard the beads and retainer.
12. Pipette the eluate up and down 5–10 times with a wide bore pipette tip and ensure any visible DNA aggregates are dispersed.
a. After pipetting, incubate at 37°C for 30-60 minutes, overnight at room temperature, or for > 24 hours at 4°C. Pipette up and down 5-10 times again before analyzing or using the HMW DNA.
Images from the Monarch® HMW DNA Extraction Kit for Tissue from NEB
