
2 Equipment Needs Skiing and Snowboarding
Equipment Needs for Skiing
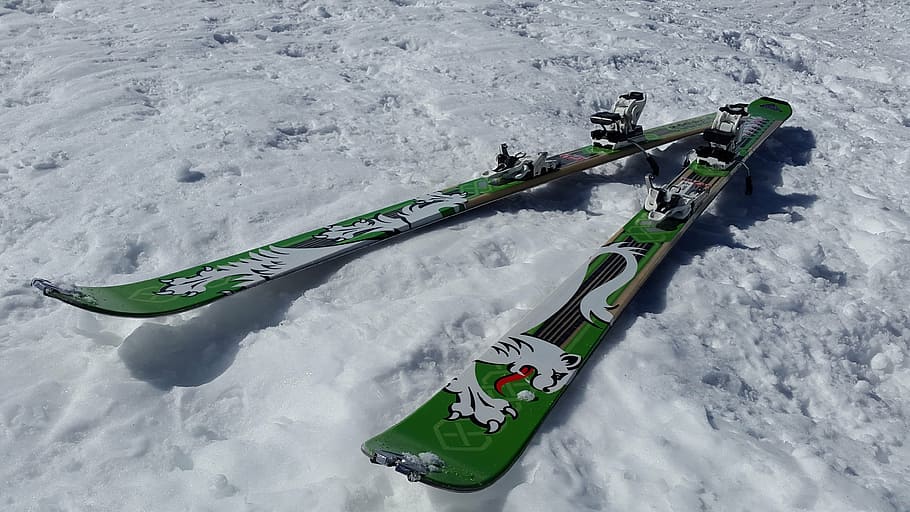
1. Skis
Skis are the most integral part of skiing equipment as they allow the individual to move through and over the snow. Skis are created from a mixture of steel, fiberglass, and plastic and range in length from approximately four to six feet.
Structure of a Ski
- Nose of the Ski: The nose of the ski refers to the tip of the ski in front of your toes. This area is not entirely flat. It noticeably curves upward much like an elf’s shoe. Since it is the nose that strikes the snow first while skiing, the upward curve allows a ski to ride over the snow effortlessly.
- Tail of the Ski: The tail of the ski refers to the tip of the ski behind your heel. These are generally straight cut with well-rounded corners. The distance between the nose and tail of a ski is the length of the ski.
- Base and Deck of the Ski: The base is the area below your ski that comes in contact with the snow. The deck is the area on the top where your boots attach. When you place your ski on a flat floor, you will notice that the entire base of the ski is not in contact with the floor. Just like the arch of a human foot, the center of the ski arches upward leaving a small gap between itself and the floor. This gap is known as camber. The front and back parts of the ski that are in contact with the floor are known as contact points. The camber helps distribute the weight of the skier to the nose and tail of your ski thereby increasing the surface area bearing the skier’s weight.
Attribution: Valugi, CC BY 2.0 Deed, https://www.flickr.com/photos/7362334@N08/2223731660
- Toe Binding: The tip of the binding closer to the nose of the ski is called the toe binding. It is a cup like structure into which the toe of your ski boot is placed.
- Heel Binding: The tip of the binding that is closer to the tail of the ski is called the heel binding. It is a cup like structure into which the heel of your ski boot is placed. The heel binding also comes with a lock that clicks into place when you push your weight through your heel thereby securing your ski boot to the ski. The distance between the toe binding and the heel binding is the length of the binding. This length can be adjusted to fit the size of your snow boot.
- Brake Arm: All modern skies are designed to pop off from the ski boot when a skier falls down the slope, which reduces the chances of injury. Ski brakes are present to stop the skies from sliding down the slopes once they come off. When your boot is out of your binding, a section of the binding immediately digs itself into the snow, stopping the skies from sliding down. This section is known as the brake arm.

Attribution: Creative Commons Attribution-Share Alike 3.0 Unported, https://commons.wikimedia.org/wiki/File:Salomon_bindings_1980s_2011.jpg
2. Bindings
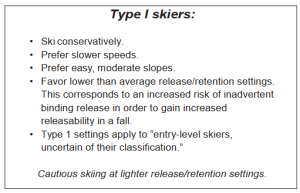
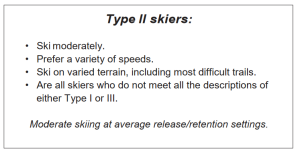
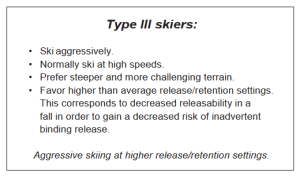
Bindings can be adjusted to suit your skiing ability and the type of skiing you will be doing. The release/retention settings on the ski binding are a compromise between holding you ski boot in the binding and the ability of the binding to release under stress. A loose setting favors the release function; a stiff or higher setting favors retention and will not come off easily. It is the skier’s responsibility to determine skier type. The binding setting will then be determined by skier type, height, weight, and age. Classify yourself and provide accurate information to decrease the risk of injury.
3. Ski Boots
Ski boots have three distinct functions:
- Boots are an integral part of the boot binding system that holds you on the skis and are very important in the release aspect of the bindings. Be sure the boot is compatible with the binding and functions correctly. The toe, heel, and bottom of the boot are important links in the release function of the binding.
- Ski boots transmit the movement of foot, ankle, leg, and upper body to the skis. As we ski, we will be making many body movements. These movements are transferred to the ski through the boot. If the boot does not fit, the skis will not respond to the movement; consequently, we are forced to exaggerate our movements. The result is fatigue, imbalance, and less control. Thus, boot fit is very important.
- The third function is to protect the foot from injury and cold. Therefore, what we look for in boots is function, fit, and warmth.
The video below provides an overview of how to put on ski boots. Additional tips for wearing ski boots:
- Be sure your socks are pulled up straight
- Wear clothes that can be pulled up five inches above your ankle bone
- Pull your snow pants down over your boots (not inside the boot)
4. Helmet
A helmet is a very important piece of safety equipment. Helmets protect the head and help reduce the severity of a range of injuries such as skull fractures, concussion, and lacerations. To select the correct size helmet you will need to know the circumference of your head. If you are unsure of the correct size, the rule of thumb is that if the helmet does not move around when you shake your head, then it is a correct fit. A helmet should be comfortable and supportive, but still allow for normal head and neck movement.
5. Goggles
Goggles help battle glare and protect your eyes from the snow, debris, and wind while riding down a mountain.
6. Ski Poles
Ski poles are not used by all skiers, but they can provide an advantage with balance, rhythm, accuracy, timing, and support. The most important consideration for poles is their length. The length of the poles will affect the body position. Pole lengths will vary with personal preference, but an easy way to determine the approximate correct length is to turn the pole upside down and grip it just below the basket. If the pole is the correct length, your forearm will be parallel to the ground.
Equipment Needs for Snowboarding
1. Snowboard
Snowboards are the basic equipment for snowboarding. Usually, the snowboard is made of a wood core that is between multiple layers of fiberglass. Other elements like carbon fiber, Kevlar, and aluminum are also used in the making a snowboard. The nose and tail of the board are curled in upward direction to ensure flawless movement on even or uneven snow.
Based on different variants of the sport and the surface used, different types of snowboards are used:
- Freestyle board – In a freestyle board, the board is a mirror image along the lateral axis. These boards are mostly used on surfaces like metal rails, logs, boxes, etc. in terrain parks. Beginners may prefer freestyle boards, as they are shorter and easier to control.
- Free ride boards – These boards are typically longer in length than freestyle boards. These boards are typically directional and have a pointed tip suitable to be placed along the direction of motion. This type of board can be used on any surface starting from back country riding to big-mountain descents.
- Alpine boards – Alpine boards or racing boards are long, narrow, and rigid in shape and similar to free ride boards. They are also typically directional and are specially designed to excel in groomed slopes. The narrow shape helps the rider to perform better during a race. Mostly hard plastic boots are ridden with an alpine board.
For beginner riders, a board that is too long is going to be really hard to control and maneuver. If your board is too short, you’re going to have less stability as you get into higher speeds. For a perfect fit, a good rule of thumb to follow is that if you stand your board on its tail and stand right behind it, the nose of the board should be between your chin and nose.
2. Bindings
The main functionality of bindings is to hold the boot of the rider in proper place in order to efficiently transfer the rider’s force into the motion of the board. Based on their characteristics, there are three types of bindings.
- Strap Bindings – In strap bindings, the shoes are held on the board using padded buckle straps. These straps are tightly fitted over different parts of the shoe to distribute pressure. Normally two strap bindings are used, but in some cases, people use three strap bindings. These are the most common type of bindings.
- Step-in Bindings – Step-in bindings were improvised in order to provide better control than strap binding. Here the riders use specially designed step-in boots and place their foot over the step-in binding.
- Hybrid Bindings – Hybrid designs are mostly used in case of freestyle and recreational riders because of the minimum risk involved with it. They are very similar to strap-in bindings, but the foot of the rider enters the bindings through the back side then flipped up and tightened with a clamp to give a proper grip to the rider.
3. Boots
You can think of snowboard boots as big, bulky snow boots. Your boots should be snug, but not tight to the point of restriction or uncomfortably tight once fully fastened. Poorly fitted boots will not provide ample ankle support and will make it harder to control your snowboard. A softer boot will make a more comfortable and smooth ride, however, comfort comes with a tradeoff as a soft boot will lack control on hard snow or at speed.
Based on different designs, there are three types of boots: standard boots, step-in boots, and hard boots.
- Standard Boots – With standard boots, no part of the boot is connected to the board; most of the applied pressure is achieved through the binding
- Step-in Boots – With step-in boots, metal clasps attach the boot to the step-in bindings on the board
- Hard Boots − Hard boots use special bindings and are mostly used in case of alpine snowboarding for better control over the board during the race
Snowboard boots come with a variety of different lacing systems: traditional laces, speed zone, or a boa system as shown in the videos below.
4. Helmet
A helmet is a very important piece of safety equipment. Helmets protect the head and help reduce the severity of a range of injuries such as skull fractures, concussion, and lacerations. To select the correct size helmet you will need to know the circumference of your head. If you are unsure of the correct size, the rule of thumb is that if the helmet does not move around when you shake your head then it is a correct fit. A helmet should be comfortable and supportive but still allow for normal head and neck movement.
5. Goggles
Goggles help battle glare and protect your eyes from the snow, debris, and wind while riding.
References
- Colonna, M., Nicotra, M., & Moncalero, M. (2013, October 21). Materials, designs and standards used in ski-boots for Alpine Skiing. MDPI. https://www.mdpi.com/2075-4663/1/4/78#
- Snowboarding – equipment. Online Tutorials, Courses, and eBooks Library. (n.d.). https://www.tutorialspoint.com/snowboarding/snowboarding_equipment.htm
- Cottrell, J. (2011). Skiing everyone. Hunter Textbooks.
