
14 Turning and Speed Control
Traverse into a Turn
One of the most important things to learn when snowboarding is how to turn. Once you know how to turn, you can control your speed and direction and avoid obstacles. To turn, you need to shift your weight from one edge of the board to the other. To do this, bend your knees and lean in the direction you want to go. For example, if you want to turn left, lean your left shoulder and hip towards the left side of the board shifting your weight onto your left foot. To turn right, shift your weight onto your right foot. One thing to keep in mind is that you should always try to keep your upper body facing downhill. This will help you maintain balance and control as you ride. Remember to turn your shoulders in the direction you want to go. This will help you make cleaner turns.
- Just as you did while traversing, start shifting your weight over the front foot.
- But this time let the board flatten so you head straight downhill (into the fall line, the most direct route downhill).
- As you flatten the board, get into a centered, athletic stance while still keeping more weight on your front foot.
- Once you are on a flat board and in the fall line, start moving onto your new edge in a J-turn (either heel-side or toe-side).
- Aim for good body position with your arms relaxed at your sides and knees tracked over your toes. Your legs and ankles are doing the work while your upper body is calm.
- Come to a stop and practice on the other side.
Tip: If you flatten the board too quickly, you may catch an edge. Do not rush this part. If you are nervous, try this at the bottom of the run so you do not gain too much speed.
J-Turns
One of the first skills you will learn when riding a snowboard is the J-turn, which is how you start shaping a turn. When learning the J-turn, you will glide straight and turn slightly uphill in the shape of the letter J. Practice first with the front foot strapped into your binding and your rear foot resting on top of the board.
Toe-Side J-Turn
- Point your snowboard straight down a gentle slope and glide forward.
- Shift your weight to the front foot and over your toes.
- Move your hips over the toe-side edge as you flex your ankles and knees.
- Getting your weight over that toe-side edge should start to turn the board across the hill.
- Repeat the process while you practice on a gentle slope with a flat runout.
Heel-Side J-Turn
- Point your snowboard straight down a gentle slope and glide forward.
- Shift your weight toward the front foot and over your heels. You should feel your calf and boot hitting the front highback.
- Move your hips over your heel-side edge as you flex your ankles and knees.
- Getting your weight over that heel-side edge should start to turn the board uphill.
- Repeat the process while you practice turning across a gentle slope with a flat runout.
Tip for J-Turns: Do not stand up tall. For your heel-side turn, keep your knees bent like you are sitting in a chair.
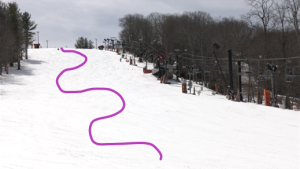
Skidded Turns
Skidded turns are used to slow your momentum, which is good for beginners. To create a skidded turn, you make a toe-edge turn and turn your board sideways so that your board skids down the slope. Then you quickly slide your board into a heel-edge turn and turn your board sideways. Make these toe turns and heel turns to slow your momentum slightly, you should be able to do these skidded rather quickly. As you practice these, reduce the amount of time between board slides.
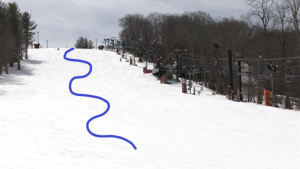
Linking Turns
Linking turns simply refers to switching between heel and toe edge. Also called S-turns or regular turns, they simply refer to the ability to change turns successfully. Once you have turned in one direction, rather than coming to a stop, continue traversing across the slope and start to make another turn in the opposite direction. Common mistakes include leaning too far toward the tail of the board or getting on an edge too soon.
To steer your board in the direction you want to go, you will want to focus on using both feet and remaining relatively centered on your board. A common mistake many riders make is putting too much weight on their back foot when turning, which causes the back foot to move straight down the fall line and create skidding as you turn. These are commonly called “windshield wiper turns.”
A number of key points to keep in mind:
- Traverse across the hill before starting your turns.
- Carry speed across the hill at the start and finish of your turn to create a nice rounded shape to your turns.
- Initiate your turns with your front foot and allow your back foot to follow the same path your front foot takes.
- Start with more weight on your front foot but even out the weight onto both feet by the end of your turn.
Turning on Steeper Terrain
Beginners tend to side slip down slopes rather than turning on steep terrain. To improve turning on steeper terrain you will want to:
- Bend your knees enough so your body matches the slope’s pitch.
- Weight into your front foot to successfully start turning.
- Do not be afraid to over-exaggerate that upper body lean when you are refining the technique.
Carving
When carving, you ride on the edge of your snowboard for maximum control and minimum snow displacement in turns. Carving means your snowboard will tip on edge and you will cut across the snow without skidding. This will allow you to maintain more speed as you travel down the slope. Carving requires just two steps: tipping your snowboard on edge and adding extra pressure.
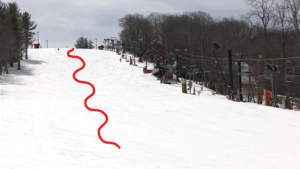
Controlling Speed When Turning
Varying the shape of your turns will help you control your speed. Wide turns, sometimes called closed turns, will help you slow down.
Tighter turns, called open turns, will help you speed up. When making open turns, instead of riding all the way across the slope, you will make more frequent turns while keeping up your momentum.
You can also make your traverse longer across the slope so you have more time to regain control before making the next turn. To slow down your speed you can also travel slightly uphill as you traverse. Be sure to always look uphill for traffic when riding across the trail.
As you travel down the slope you can vary your speed and have greater speed control when you combine applying and releasing edge pressure and turn shape.
